


ChatGPT now runs product-feed ad campaigns through OpenAI's Ads Manager, and you can power them with the same enriched Marpipe creative you already run on Meta, Google, and Pinterest. Instead of building a separate ad for every product, you connect your Marpipe feed once and OpenAI selects an eligible product to show when your ad serves.
This article covers how to prepare your enriched feed in Marpipe and connect it to OpenAI's Ads Manager so your catalog can start serving as ads in ChatGPT.
This is the paid ads path (OpenAI Ads Manager). It's separate from OpenAI's organic commerce feed, which surfaces products in ChatGPT's shopping results without a campaign. Both read the same catalog, so the feed you build in Marpipe works for either.
Before You Start
You'll need:
- An OpenAI Ads Manager account. You'll need an ad account at ads.openai.com. If you don't have one yet, apply through OpenAI.
- A Marpipe account with your source feed or Shopify store connected and at least one design ready to publish.
Step 1: Create Your Output Feed in Marpipe
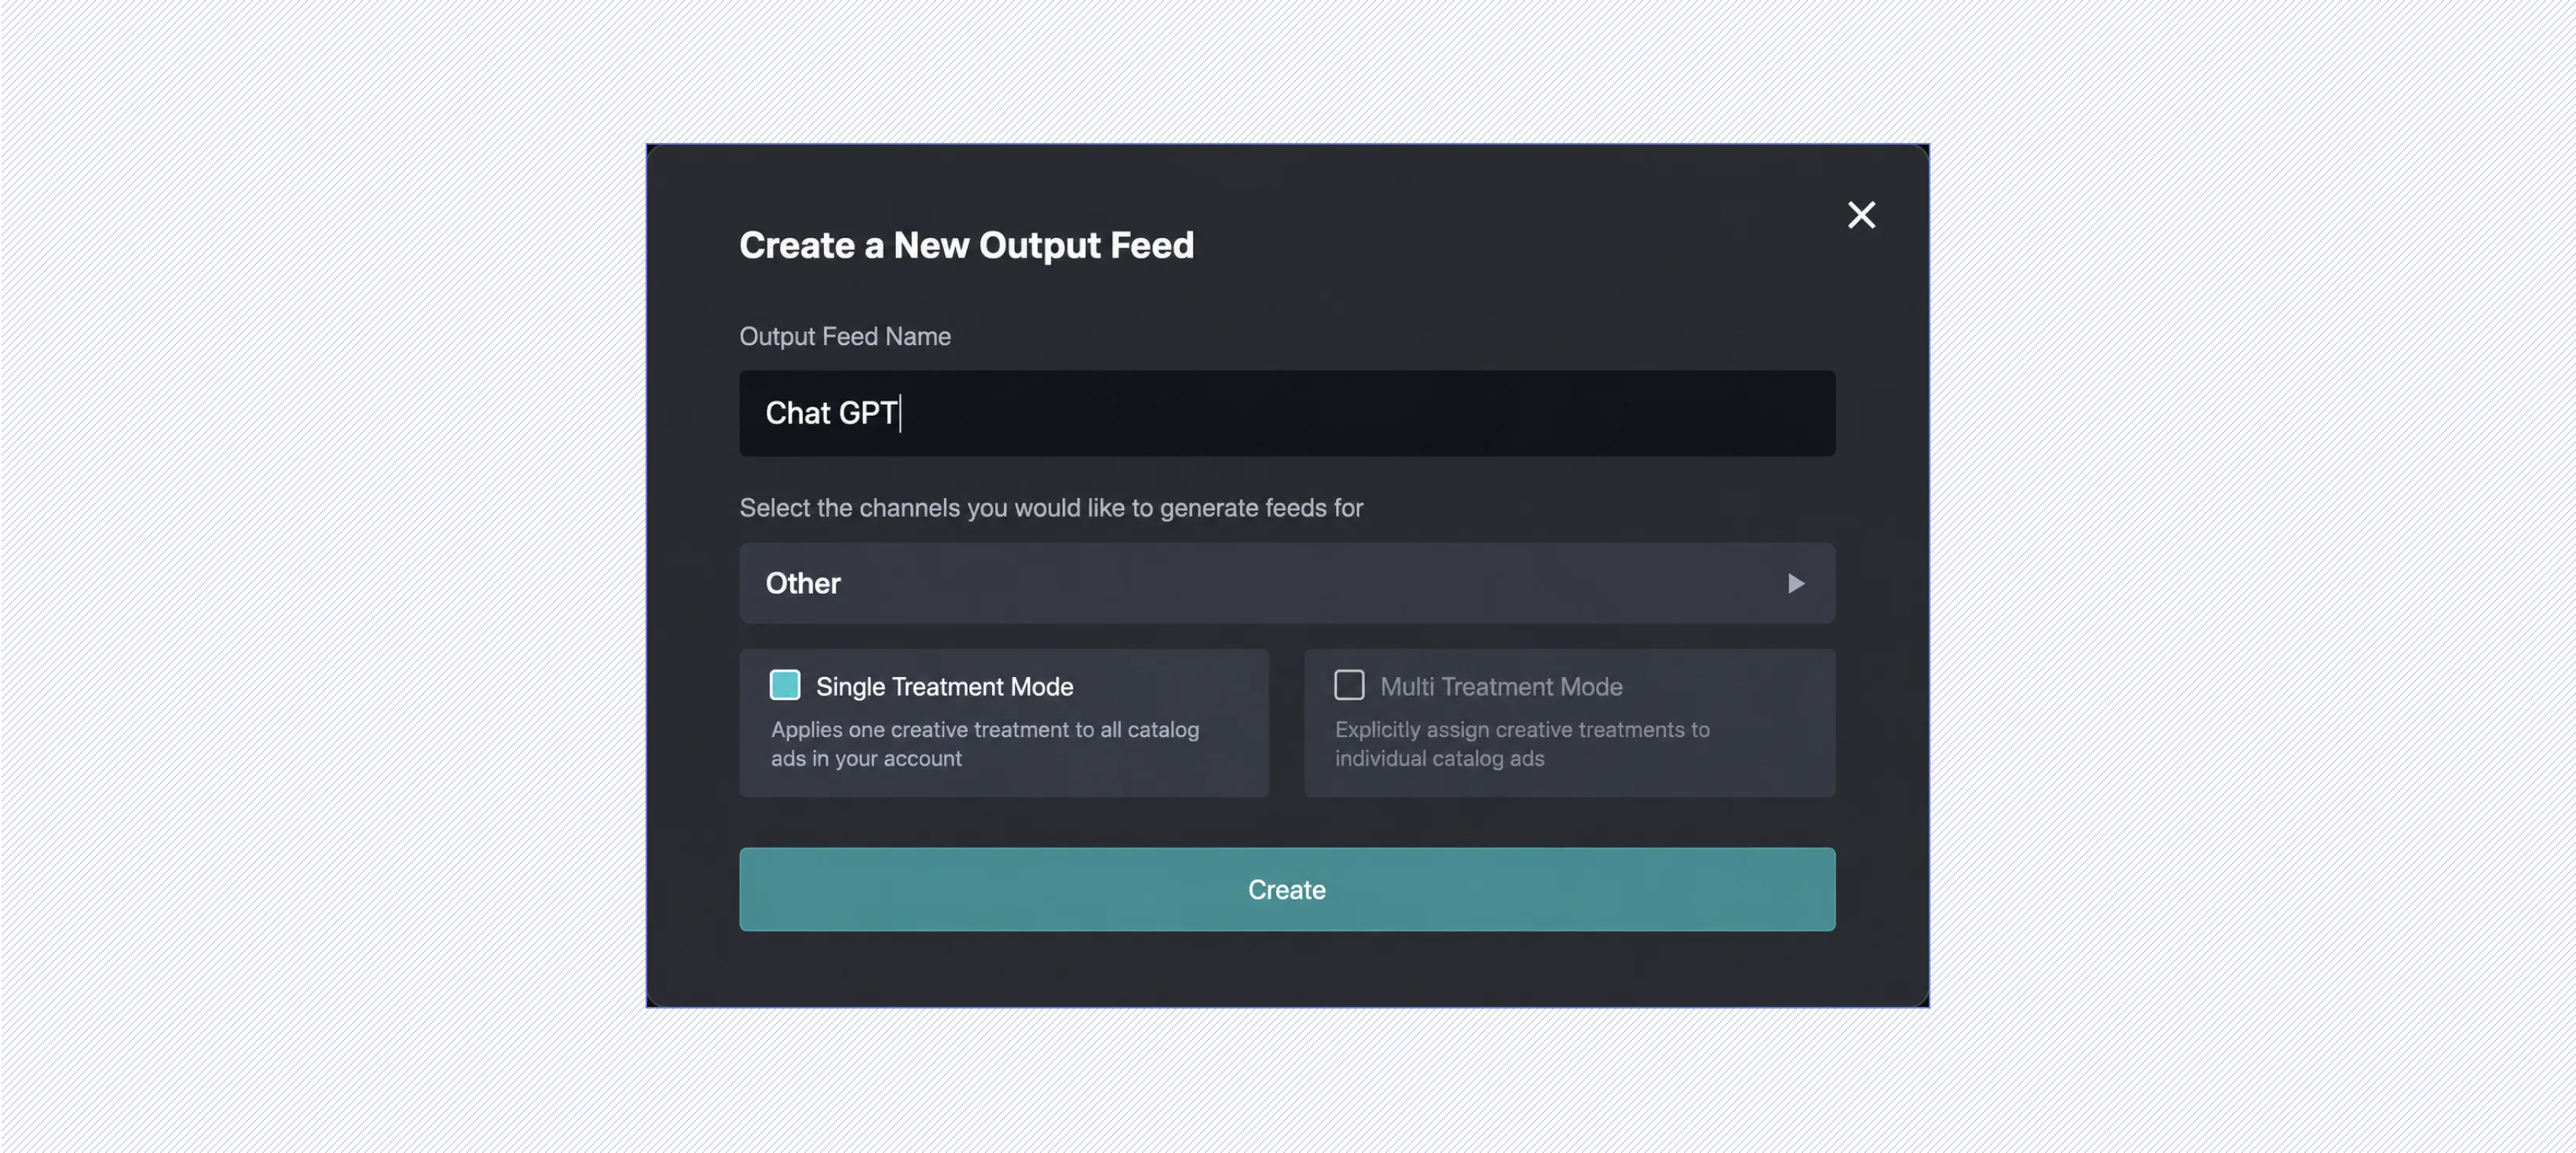
- Go to the Output Feeds tab at the top of Marpipe.
- Click New Output Feed.
- Give the feed a name (for example,
ChatGPT Ads Feed). - Set the channel to Other. This generates a standard, Google-Shopping-compatible product feed, which is the format OpenAI expects.
- Leave the mode as Single Treatment. Multi-treatment feeds are only supported for Meta — every other destination, including ChatGPT, uses a single treatment.
- Click Create.
Step 2: Mark Your Products as Ads-Eligible
This step is specific to ads and easy to miss. OpenAI will not serve a product as an ad unless the feed explicitly marks it as eligible.
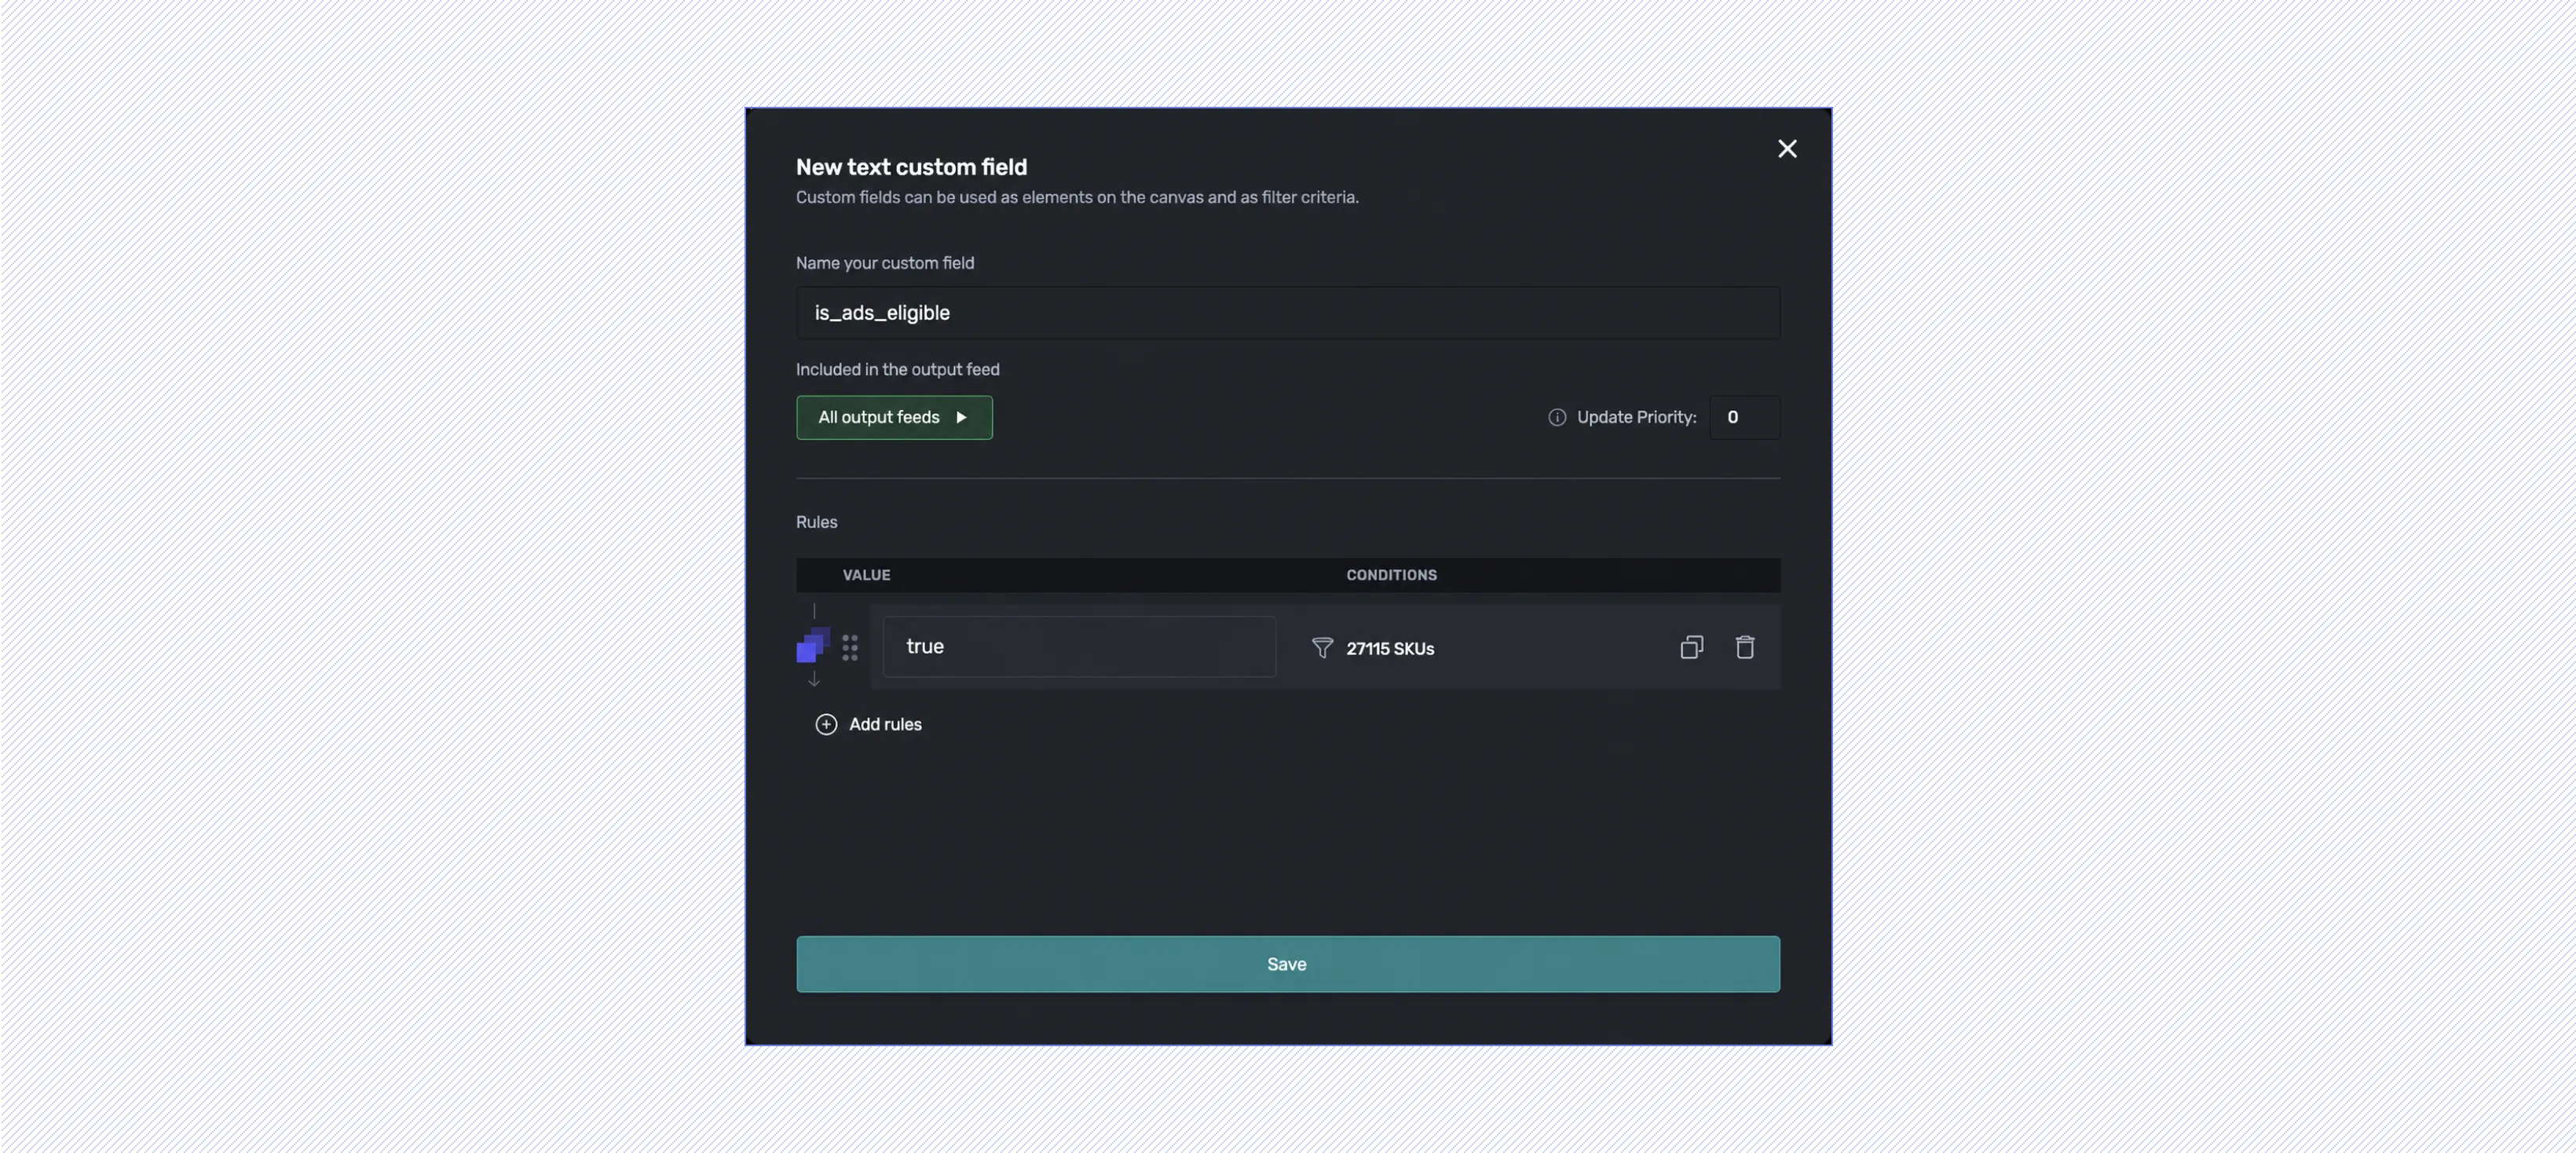
For every product you want to advertise, your feed needs a field called is_ads_eligible set to true.
To add this in Marpipe:
- From the main Manage Fields page, create a new custom field named
is_ads_eligible. - Set its value to
truefor the products you want to run as ads. - Make sure Included in output feed is toggled on so the field appears in your ChatGPT feed.
If a product's is_ads_eligible value is missing or false, OpenAI keeps it out of ads processing — even if everything else about the product is correct.
Step 3: Add Your Design(s) and Publish
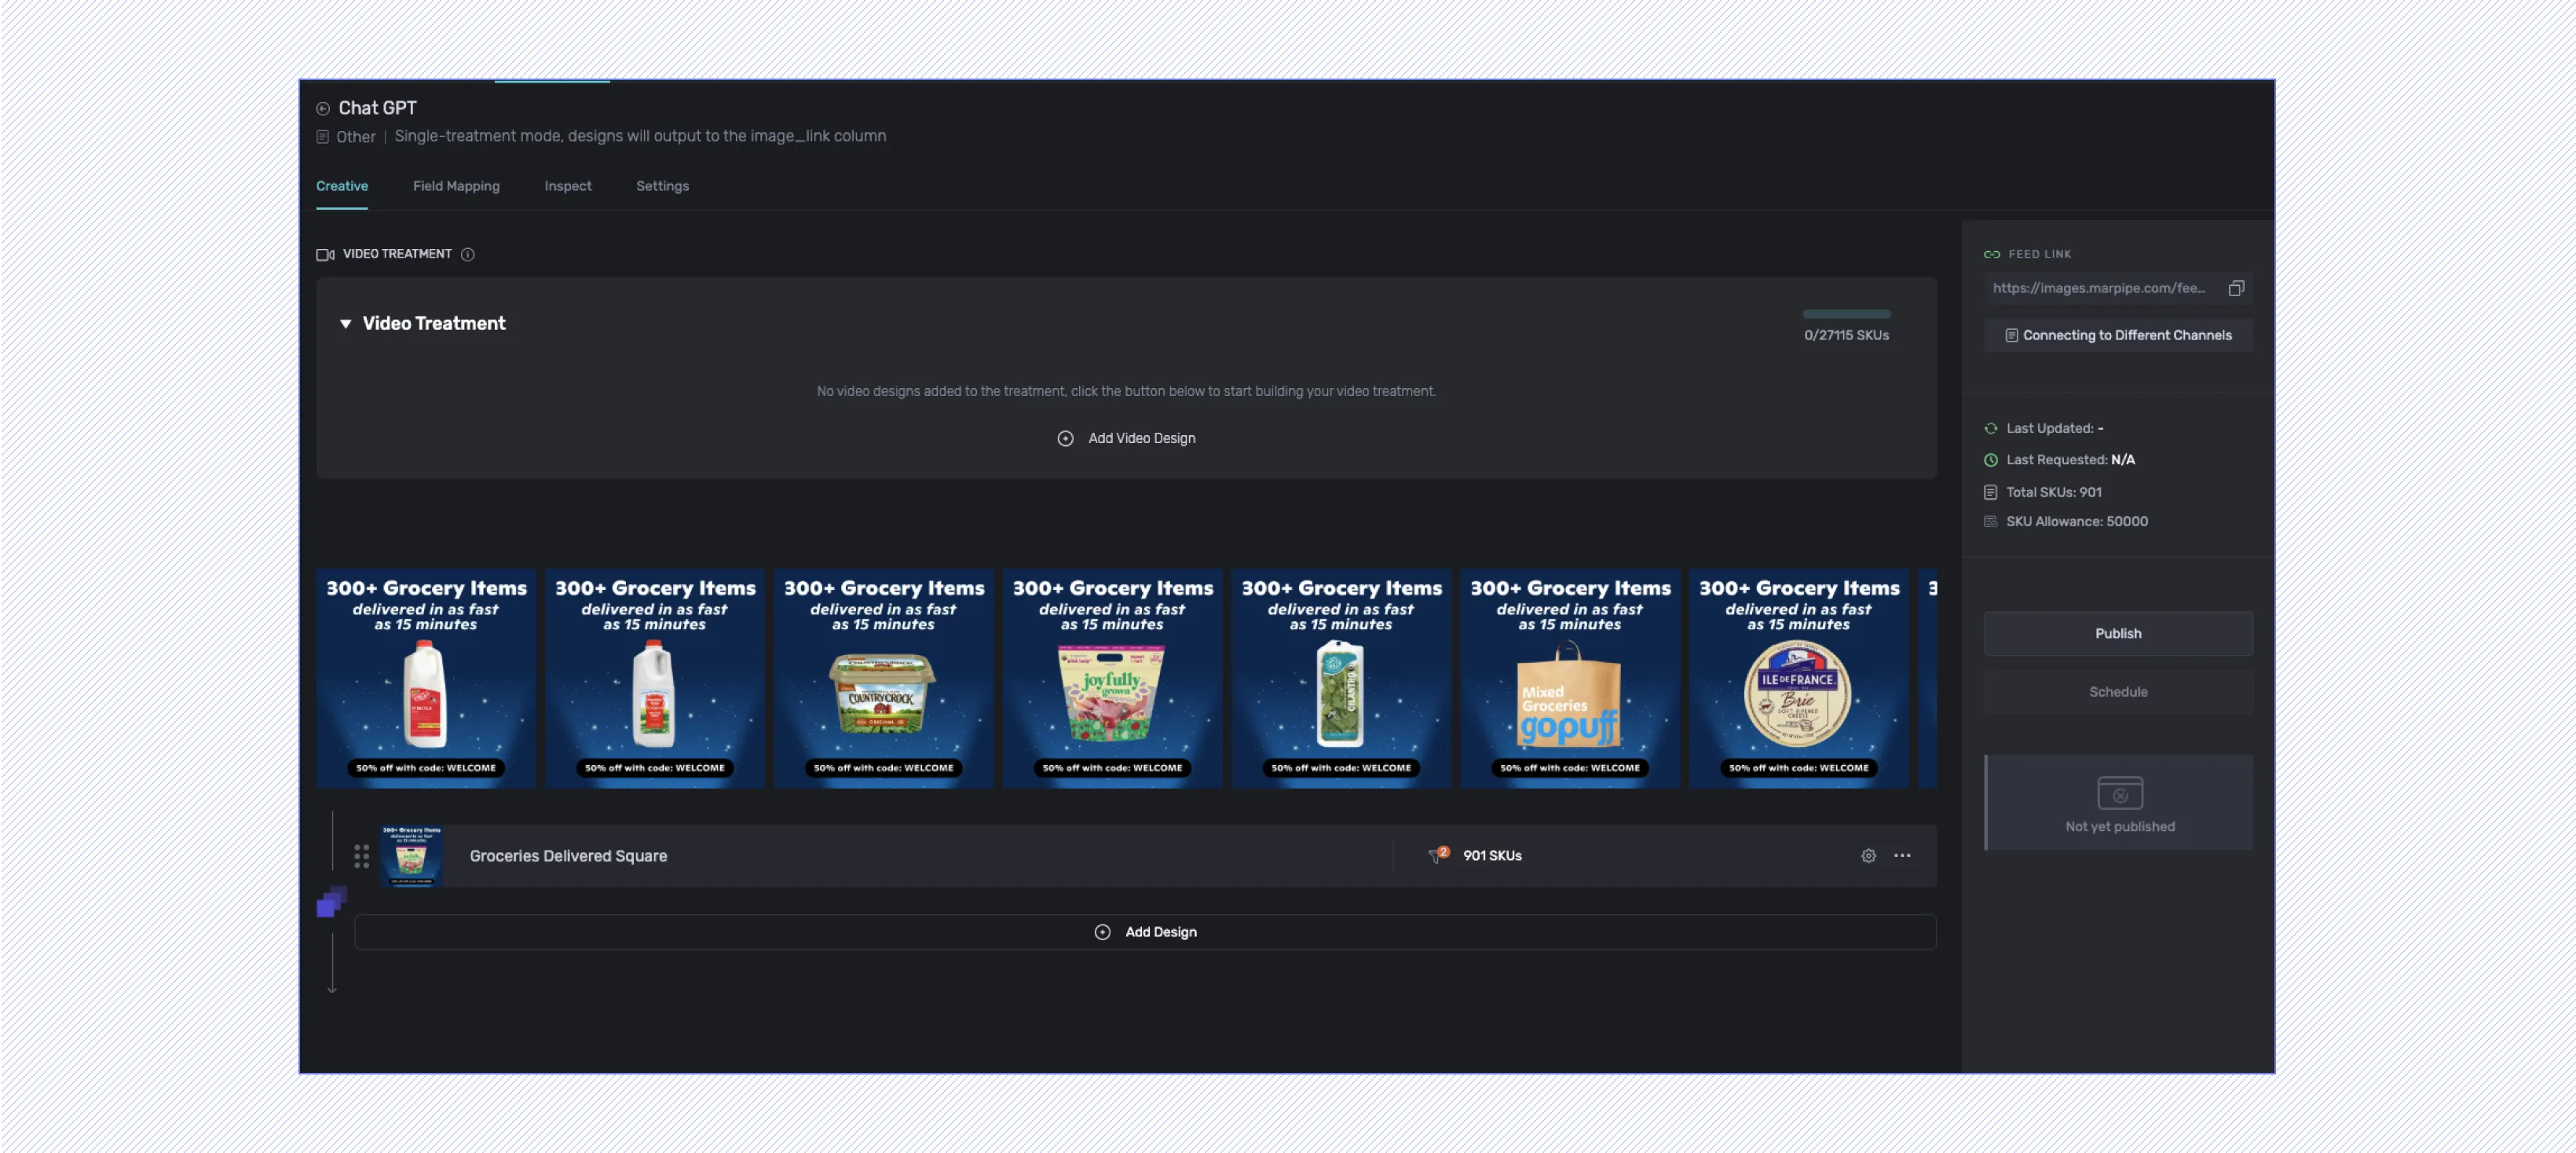
A treatment is the creative Marpipe applies to your feed — either a single feed-wide design or a group of designs mapped to different product sets. Because ChatGPT uses a single treatment feed, your entire catalog runs on one treatment. You don't create multiple treatments here; you simply add the design (or designs) that make up that one treatment.
- In your output feed, add the design you want to apply across your catalog. If you want different creative for specific product sets, add multiple designs and map each one to its product set within the single treatment.
- Click Publish.
If you want to add a design that's already being used in another feed, clone it first from the Designs page, then add the clone here.
Once published, Marpipe generates a live feed URL containing all of your product data, your enriched image fields, and your is_ads_eligible flags.
By default your output feed includes every field from your source feed plus the image fields Marpipe adds. Use Manage Fields on the output feed page if you want to trim it down — but be sure to keep the required fields (see Step 5).
Step 4: Copy Your Feed URL
On the output feed page, copy the generated feed URL. This is the same style of URL you'd connect to Meta or Google — a single hosted link that always reflects your latest published treatments and product data. Because it's live, any changes you publish in Marpipe flow through automatically.
Step 5: Connect Your Feed in OpenAI Ads Manager
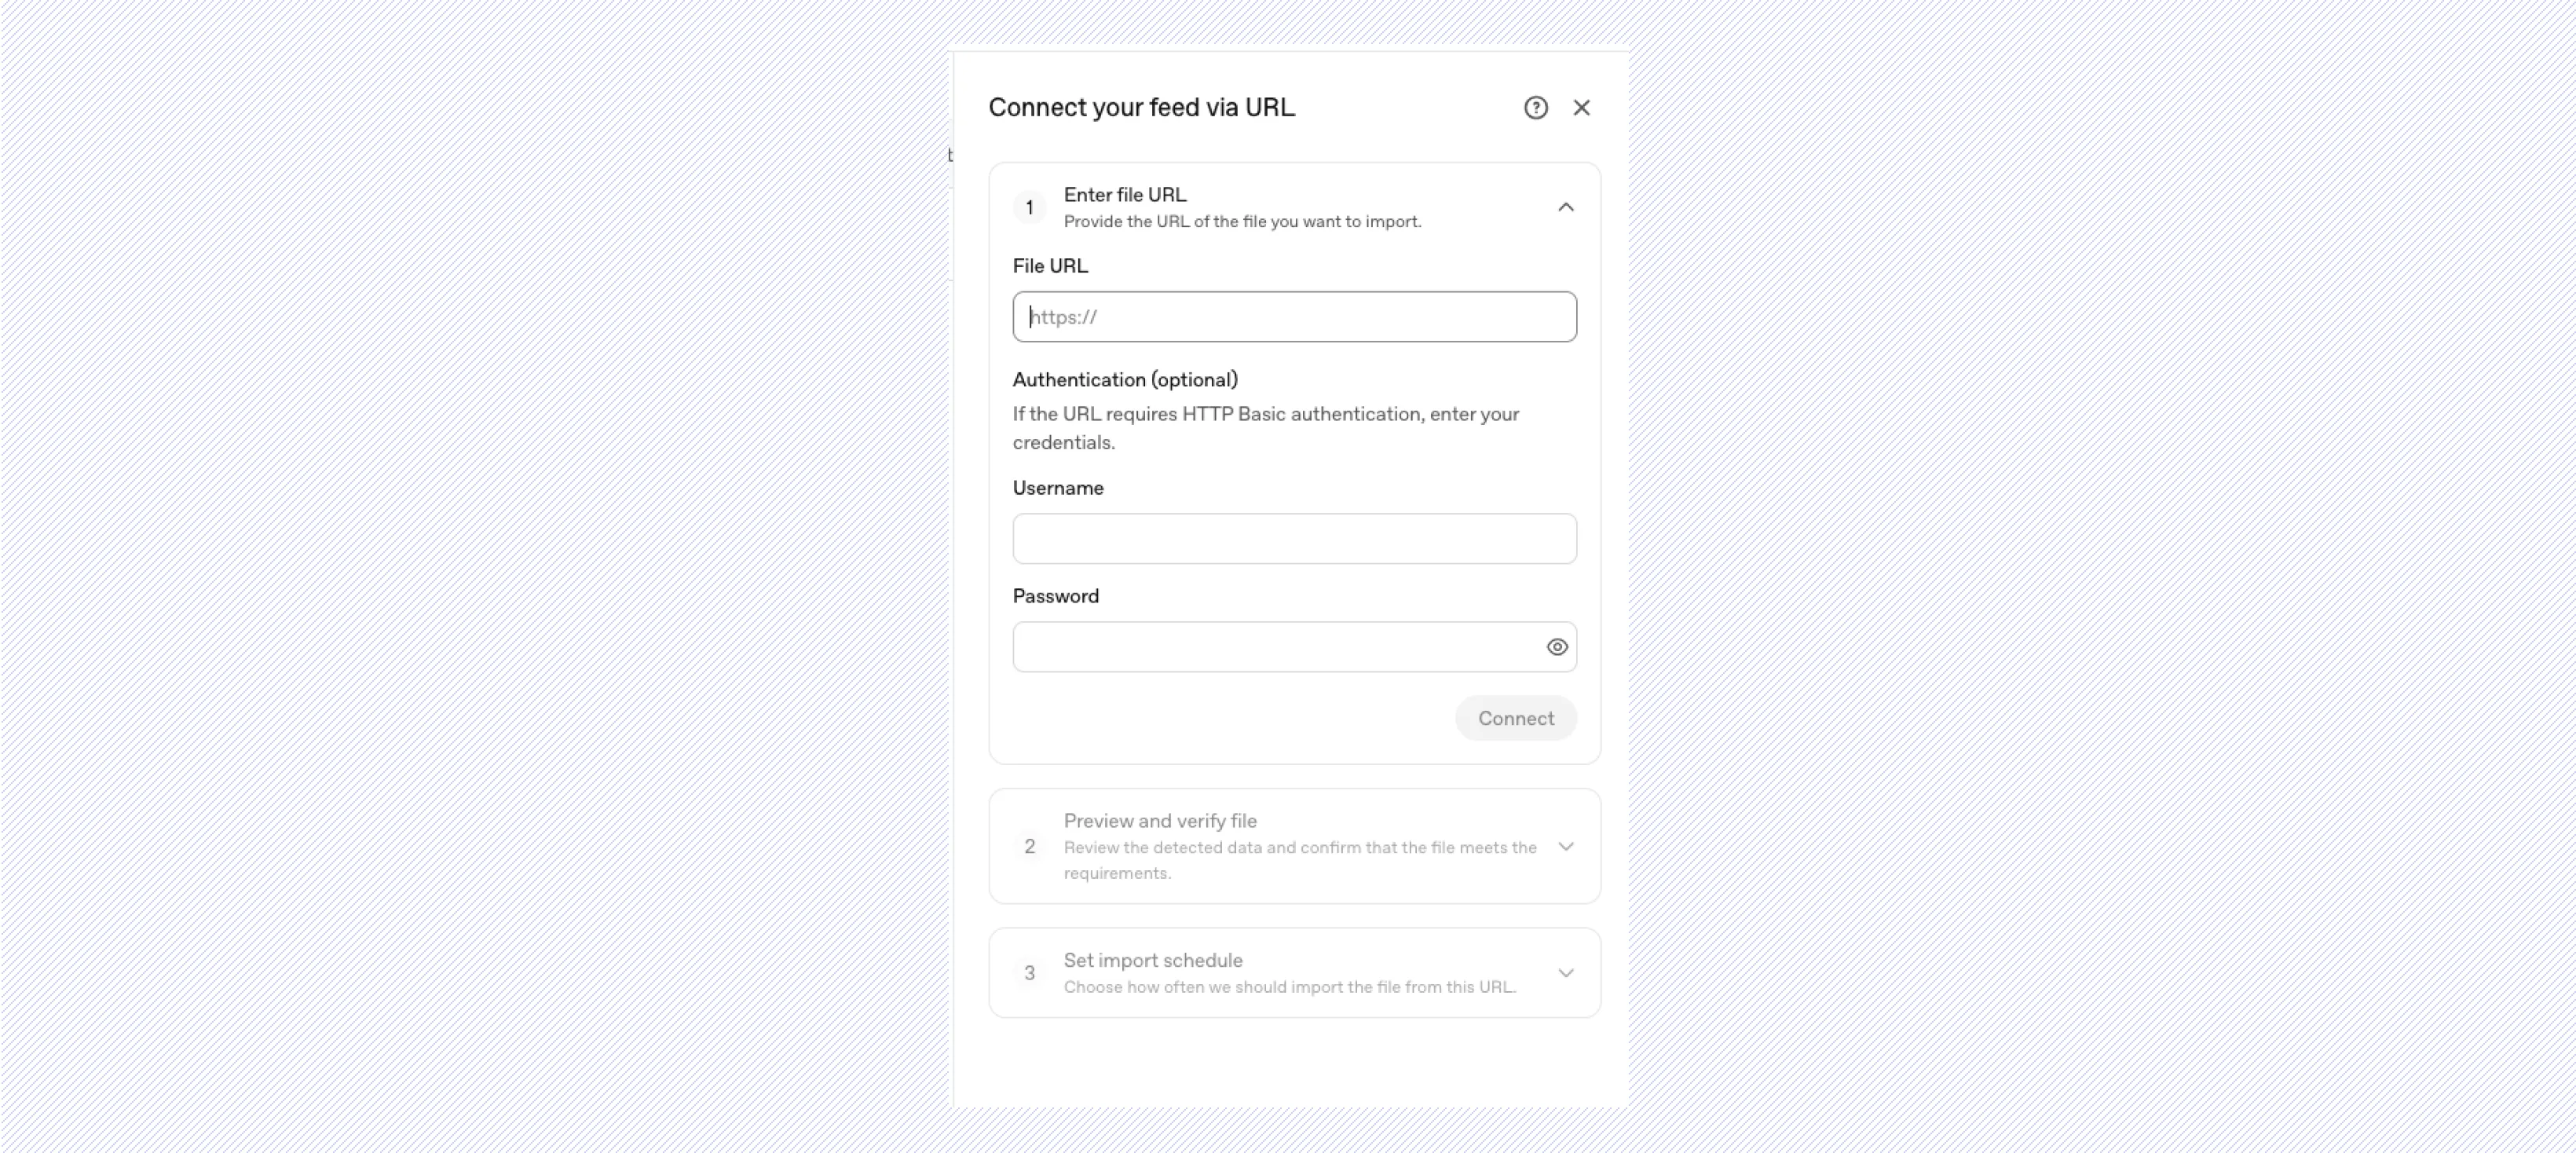
- Log in to ads.openai.com.
- Go to the Feeds area.
- Create a new feed connection and provide your Marpipe feed URL.
- Note the feed ID that Ads Manager assigns — you'll reference it when you build your campaign.
Before your feed is accepted, make sure every product includes OpenAI's required fields. OpenAI uses a Google-compatible schema, so the core set will look familiar: ID, title, description, link, image link, price, and availability, plus a product identifier (GTIN, UPC, or MPN) where available — and the is_ads_eligible flag from Step 2. See OpenAI's product feed specification for the complete field reference.
If your Feeds area shows an SFTP endpoint instead of a URL field, use whichever delivery method OpenAI presents for your account, or reach out to us and we'll help you connect it.
Step 6: Build Your Product-Feed Campaign
With your feed connected, create your campaign in Ads Manager:
- Campaign — Set it to product-feed mode and link the feed ID from Step 5. This controls your budget, schedule, and targeting.
- Product set — Optionally filter which products can serve (for example, limit to one brand or category). Leave it open to use every eligible product in the feed.
- Product-ad template — Define how the ad looks. OpenAI fills in the title, description, price, image, and destination from whichever product it selects at serving time, so you build one template rather than one ad per product.
For the full campaign setup, see OpenAI's product feed ads guide.
Marking a product as eligible doesn't guarantee it serves. OpenAI selects eligible products, evaluates the ads, and runs them through its auction. Use the product-level reporting in Ads Manager to see which products actually received impressions and clicks.
Keeping Your Feed Updated
Once connected, keeping ChatGPT current is automatic:
- Publish new treatments or product changes in Marpipe as usual.
- Your hosted feed URL updates in place, and OpenAI pulls the latest snapshot on its schedule.
There's no need to re-export or re-send your feed after the initial connection.